Like many artists, Chroma Teaching Artist Barry Sholder paints in a variety of styles and uses many tools to create his works. He recently emailed this “How-To” article on using an airbrush with Interactive. Check it out!
I have been an airbrush artist for over 20 years and have run every kind of paint and ink through an airbrush imaginable. I have now started to use one of the most versatile paints on the market. Interactive Professional Artists Acrylics can be used for virtually any style of painting applied with a brush. I have started to use Interactive as an airbrush paint. Interactive is available in tubes and jars. It does not come premixed as other brands of airbrush colors do. I feel this is good because you can mix your own values for the particular application you are after. For short runs when I’m not painting a large area, I will mix my colors in small plastic cups. I prefer to mix the colors with a paintbrush, then thin the paint to the consistency that I need, that way I can see the color better than thinned. I thin with just water to the consistency of half and half. This gets you pretty good coverage. Keep in mind that Interactive is available in 75 colors including transparent, semi transparent and opaque. So you need to choose which colors you want to use for the effect you want. Interactive also has a line of mediums that can be added to the paint to adjust drying times if that might be an issue.
In the following How-To, I used 2 of the mediums, Binder Medium, which was used as a primer, prior to any paint application and Fast Medium that speeds up drying time and painting steps making the paint film permanent. For equipment, I am using an Iwata Eclipse Gravity feed airbrush. This model has a cup molding right into airbrush frame so there are no bottles to attach and change. I use an eyedropper to put paint in the cup and you are ready to paint. I’m using a compressor that is set at 30-40 lbs. of pressure that seem to handle most of the viscosity I’m dealing with. The painting is on a stretched artists canvas 24″X36″.
I first make my detailed sketch directly on the canvas. I also decide on any compositional elements and colors that will help. Once this is complete, I then put down a coat of Binder Medium over the entire canvas. Binder Medium is not only going to seal the gessoed canvas but will also preserve my pencil drawing so my marks don’t disappear from the paint application. I usually use a foam brush for this but most any brush will do. Once the Binder is dry, I mask the aircraft off completely with masking tape and frisket material. Frisket material is not particularly good on canvas because of the rough texture, but I use it to cover the big areas. Now I start with a large brush blocking in all the sky colors not being to concerned about smoothness just good coverage. I go over some areas of the aircraft that have been masked so I don’t get any kind a haloing look. I have not added any mediums at this point. Now I take the same colors and start airbrushing the same areas I just blocked in and smooth them out. The paint is about the consistency of half and half.
Once the sky is the way I want it, I let it set up and spray a good coat of Binder Medium over the entire canvas. What this does is isolates the sky layer of paint. One thing you have to understand when airbrushing, regardless of the kind of paint you use, is you are putting down a very thin film of paint and it will be very delicate. Binder seals the film of paint so further paint applications can be added without harm to the sky.
With the sky masked I’m ready start on the aircraft. I like to use thin layers of paint on top of each other, a technique called glazing, but before I do any painting I take a small detail brush and with a dark paint with Fast Medium added, hit all the little dark details of the plane. The Fast Medium makes these marks permanent. These are my landmarks you might say, because as I spray color on, my pencil marks will start disappearing and then I would have to guess where they are, this way they will still show. I airbrush the lightest color first just to establish an overall tone. At this point all the paint I’m applying has Fast Medium added. The base coat is Titanium White and Paynes Gray, which is a blue gray. For the camouflage, I add more Paynes Gray. Once all the camo is complete I start adding shadows, which are grayer. The deepest shadows are straight Paynes Gray out of the jar. Again mask where needed to get sharp edges. I now add white highlights where need. The shadows and highlights are what really starts to give the aircraft shape. Now go back in and darken the landmarks that I previously painted, as they have lightened up due to spraying in the aircraft color.
At this point I again spray the entire canvas with Binder to isolate the painting for more detail work. Using a liner brush and a plastic scale model for reference, I paint in all the panel lines and flight surface separations. You need to be careful that you don’t paint these in too heavy otherwise it won’t look real. And if you mess up your lines you can actually wipe them off with water without harm to the aircraft because you used the Binder Medium to protect your aircraft. If you are uncomfortable with trying a liner brush, Prismacolor colored pencil will work.
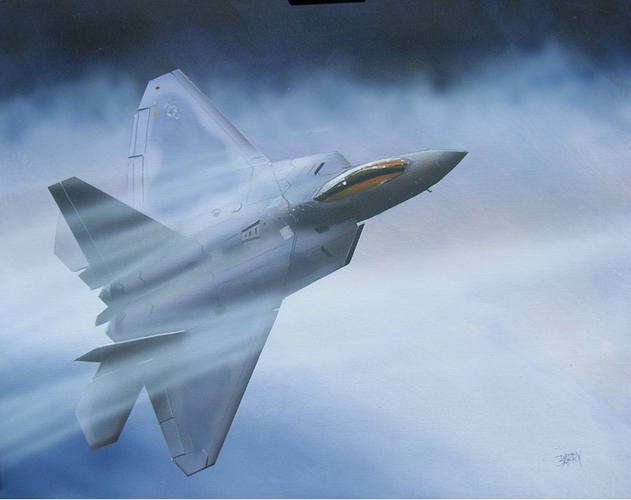
Almost done. I mask off the front of the sky at the wing and spray the vapor trails. This is done with Titanium White thinned to the consistency of skim milk, I want it to be transparent. Remove the tape and lastly I take that same mixture that was used for the vapor trail and get back about 12″ and mist the entire painting. What this does is add atmosphere and tones down the colors just slightly, and you are done.
The thing that really is impressive about airbrushing Interactive Acrylics is they go on very matte and when thinned they don’t loose the color intensity. I never had any clogging or tip dry. Although not having premixed colors handy, the fact that you can mix your own is a huge plus. You can pick up plastic bottles at most art supply stores and you are set. I hope this answers any questions about spraying Interactive Acrylics. If you have questions feel free to email me at Barry@signandart.com.